Tasks
 Updated 2 months ago
by
Stephanie Krenz
Updated 2 months ago
by
Stephanie Krenz
You can create multiple tasks in a workspace to perform different analyses. You can schedule these tasks so that they are carried out automatically once, hourly, daily, weekly or monthly.
You now have two options when adding a new task:
- Option 1: Click on Workspaces on top and then in the Workspace on the button Add new Task
- Option 2: Click on Workspaces, then on the Name of the Workspace -> in the following overview of the Tasks you can click on + Task in the top right-hand corner


In the next steps, you will now see which settings need to be set in the task.
All settings that have an Asterisk * next to their name are mandatory and must therefore be defined.
Workspace & SAP-System
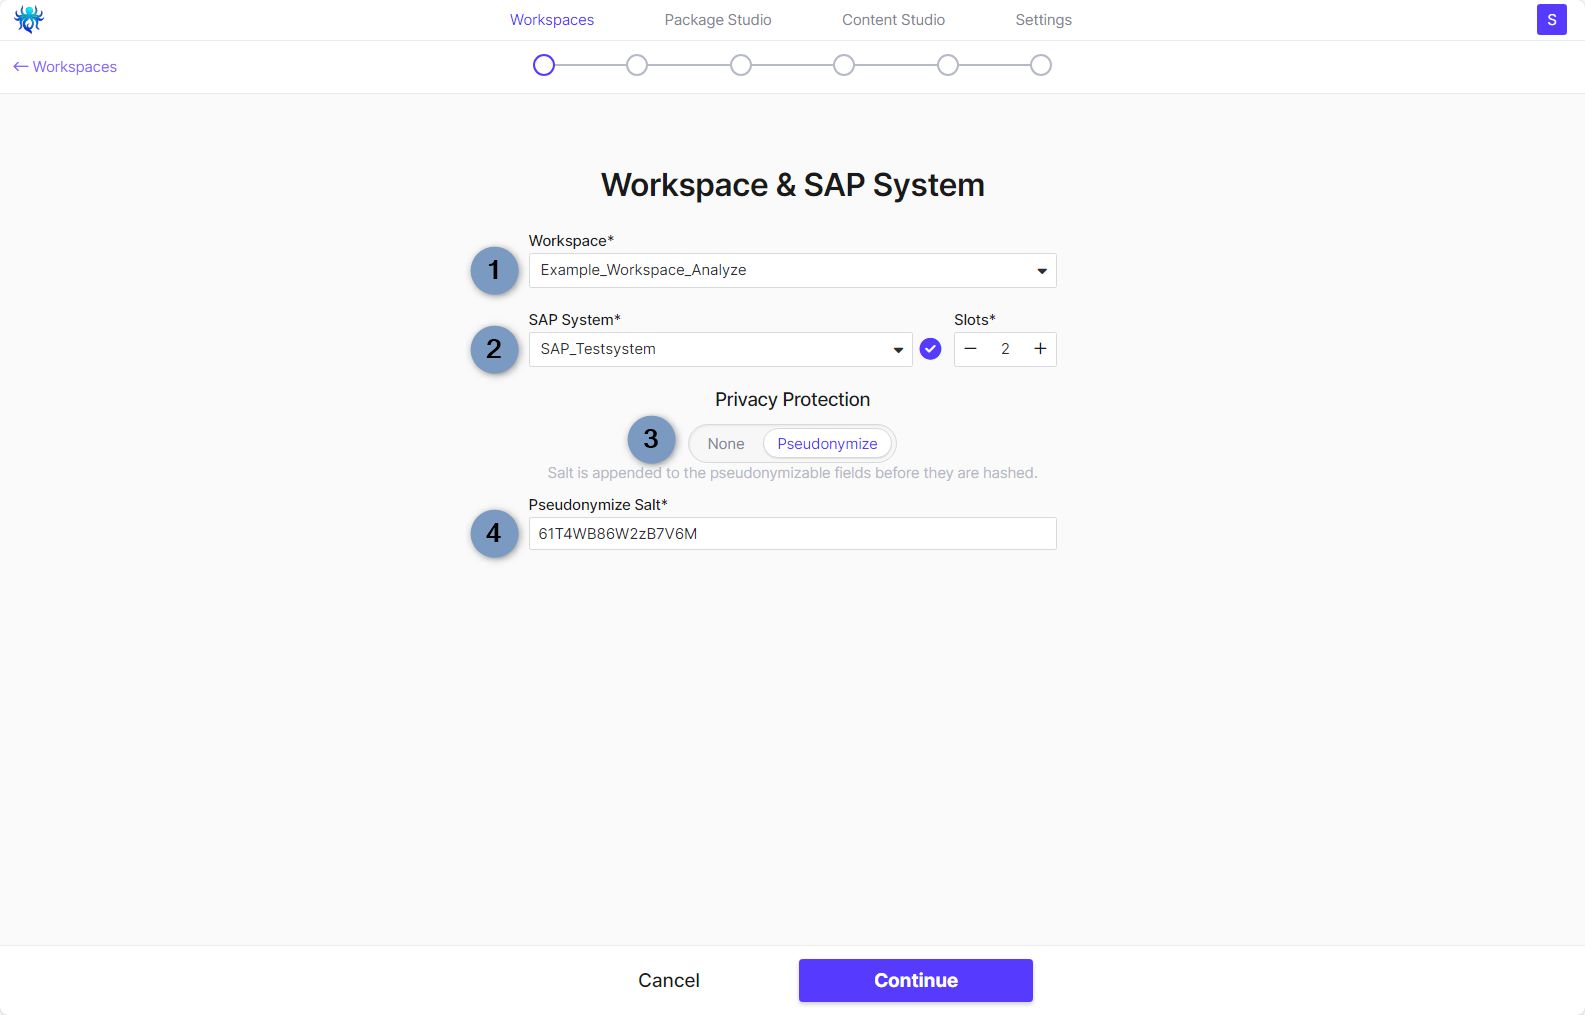
- Workspace -> Here you can change the Workspace if you have created the task in the wrong workspace in the previous steps
- SAP-System & Slots -> Determine from which SAP-system the data is to be extracted and how many tables can be extracted simultaneously (in this case 2 tables simultaneously)
- Privacy Protection -> Here you can define whether sensitive data (e.g. usernames, personal names, etc.) should be encrypted (you can also enforce encryption in relation to an SAP system) -> To do this, activate the Force Privacy Protection option when creating the connection of the SAP-system in dab Nexus via Settings -> SAP Systems)
- None -> No encryption
- Pseudonymize -> Sensitive data is encrypted with the salt entered under point 4
- Anonymize -> Sensitive data is replaced with the value XXXXXXXXXXXX
- Pseudonymize Salt -> Definiere the Salt, with which the sensitive data is to be encrypted
Then click on Continue.
Data Strategy & SQL-Server
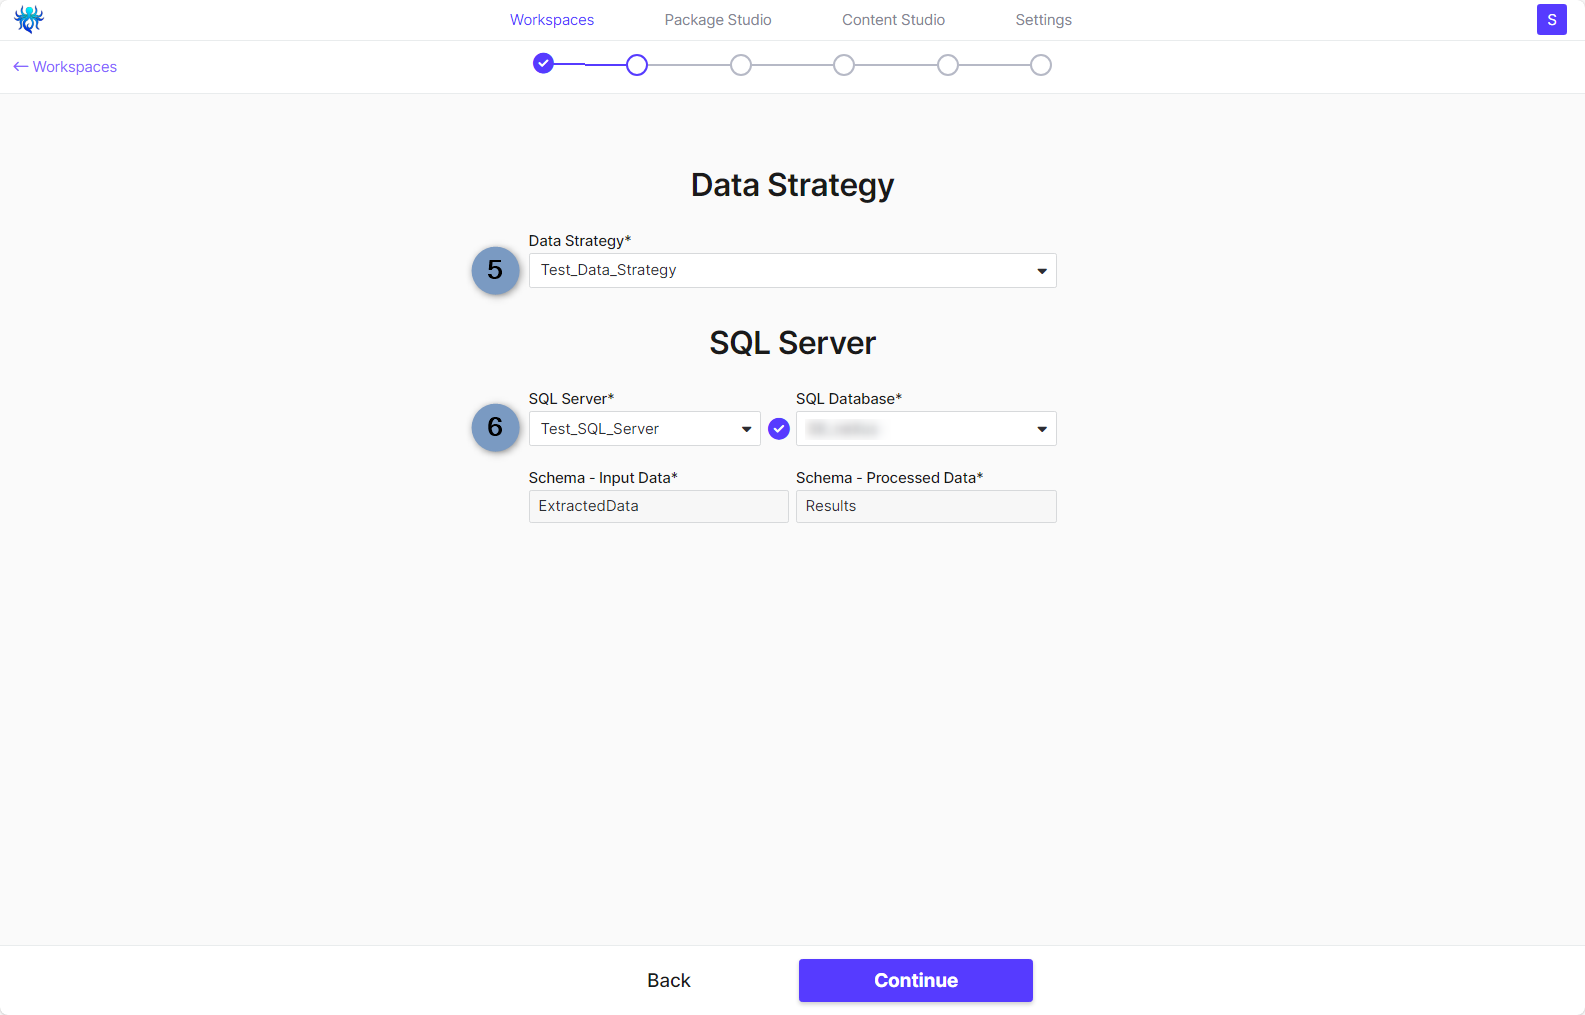
- Data Strategy -> Choose the Data Strategy, which you created via Settings -> Data Strategies
- SQL Server -> Determine the SQL server on which the extracted and analyzed data is to be stored (in this case also specifying the exact SQL database in which the data is to be stored). The two schemas are filled in automatically, depending on what you have entered in the Database Schema fields in Settings -> Data Strategies
Then click on Continue.
Scheduling
In this section, you have the option of executing Tasks once or scheduling them repeatedly. The following steps explain all possible settings.
Slider | Interval | Possible Settings | Description |
Once | no repeat | Start Time with Date and Time (including Time Zone) or Run immediately | Run is executed once either at the time entered or immediately after completion of the Task |
Hourly | hourly | Start Time with Date and Time (including Time Zone) 1 to 23 Hours | Specify the hourly interval at which the Task should be executed repeatedly |
Daily | daily | Start Time with Date and Time (including Time Zone) 1 to 6 Days | Specify the daily interval at which the Task should be executed repeatedly |
Weekly | weekly | Weekday selection Start Time with Date and Time (including Time Zone) 1 to 7 Days | Specify on which days of the week the Task should be executed repeatedly |
Monthly | monthly | 1 to 28 Days or last day 1 to 12 Months Start Time with Date and Time (including Time Zone) | Specify on which days of the month the Task should be executed repeatedly (alternatively always on the last day of the month) |
Click on Continue after setting up the schedule.
Parameter
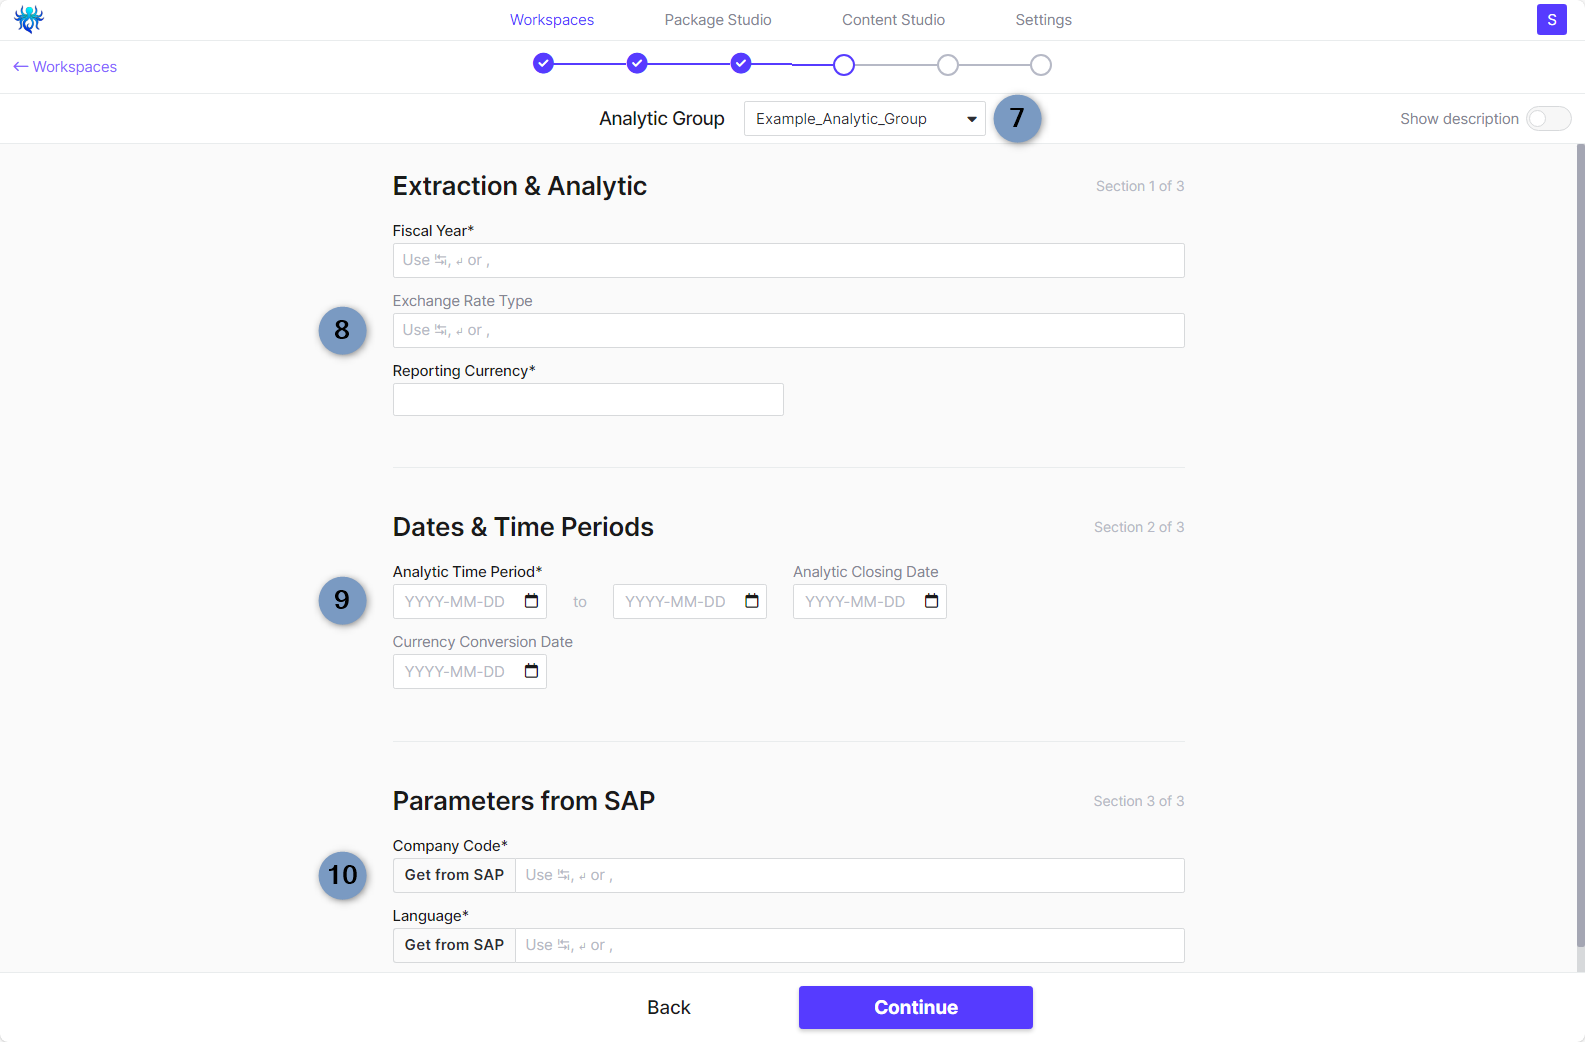
- Analytic Group -> Depending on the analytic group selected, the parameters to be entered may change (all analytic groups that you have created via Content Studio -> Analytic Groups can be selected here)
- Extraction & Analytic -> Enter the required parameters here to define which data you want to extract from the SAP system
- Dates & Time Persiods -> Define which time periods are to be extracted (Extraction Time Period) or analyzed (Analytic Time Period) -> these date ranges can be different
- Parameters from SAP -> Enter here, for example, the company code and language from which the data should be extracted
Then click on Continue.
Third-Party Services
You don't have to add a Third-Party Service. If you want to continue without one, simply click Continue below.
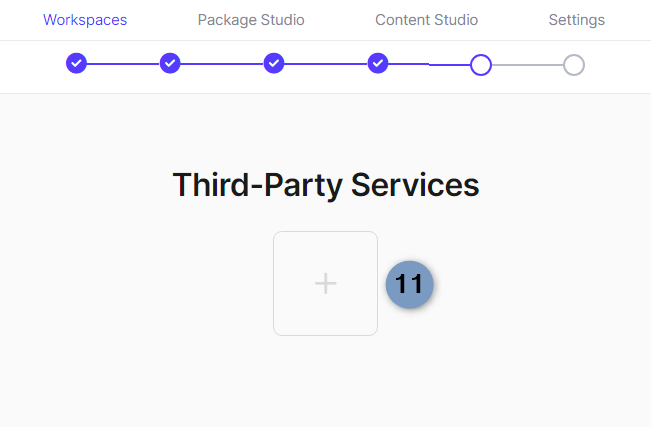
- Third-Party Services -> With a click on the big + you can add a Third-Party Service if you want to export the extracted and analyzed data directly to Excel, for example
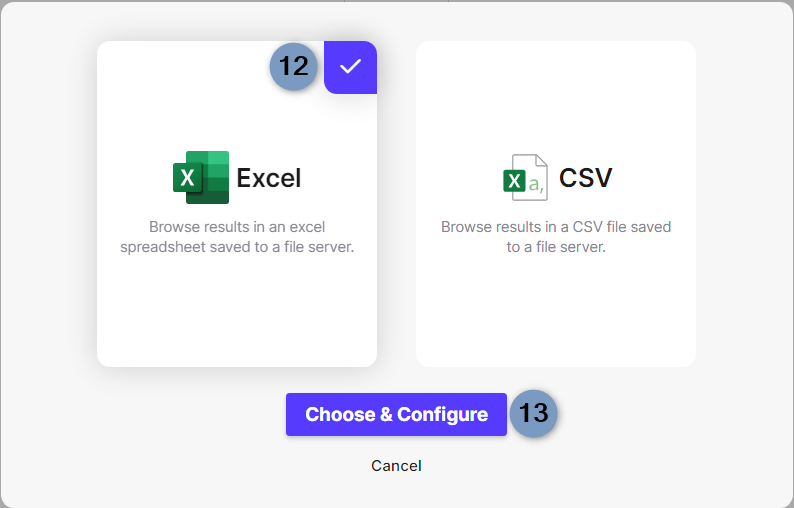
- Excel -> Click on your preferred Third-Party service, you will recognize your selection by the white tick in the purple square
- Choose & Configure -> Continue to the Configuration for the export for this Task
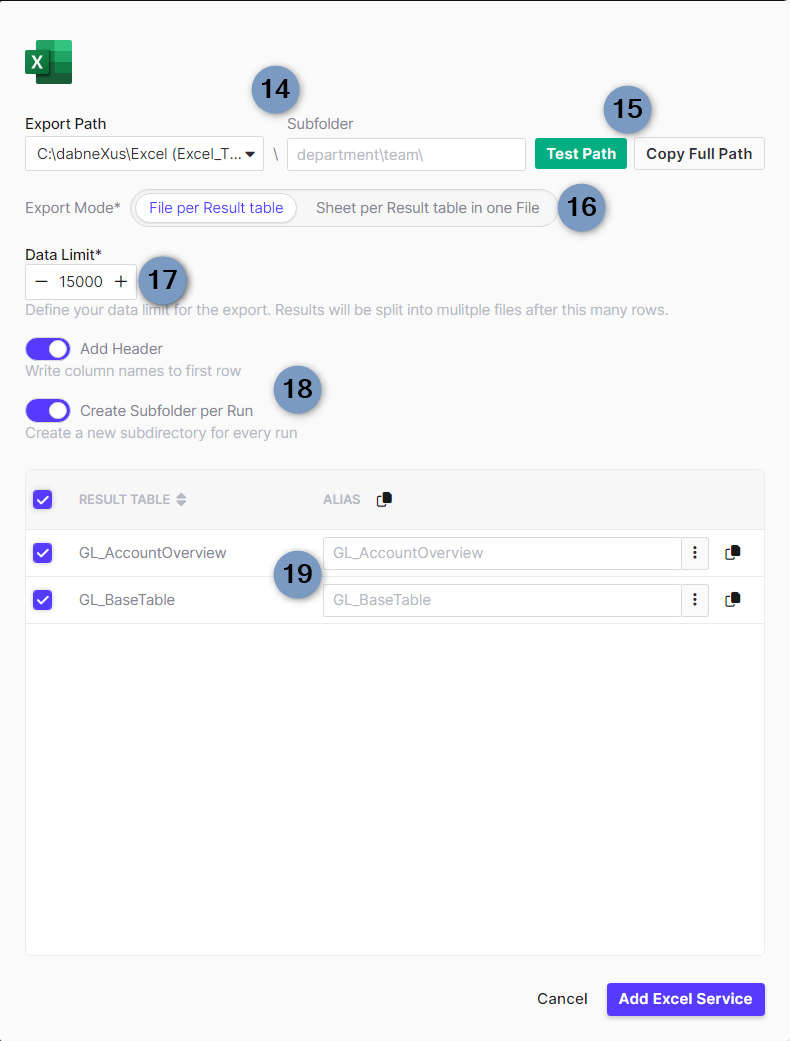
- Export Path -> If necessary, change the storage location of the export file. You can also enter a subfolder in the Subfolder field (the path entered is taken from the settings you have made in Settings -> Third-Party Services -> Excel Export).
- Test Path & Copy Full Path -> You can test the path entered here and copy it to the clipboard to open it in your Explorer, for example
- Export Mode
- File per Result table -> One Excel file is exported and saved for each results table
- Sheet per Result table in one File -> A new worksheet is opened in the Excel file for each results table, but all results tables from a run end up in a file that is exported and saved
- Data Limit -> If necessary, change after how many lines a new file should be started (the value entered here is the defined value from the settings in Settings -> Third-Party-Services -> Excel-Export)
- Add Header & Create Subfolder per Run -> Specify whether the column headings for the contents should be specified in the first line of the exported file and whether the exported files should be saved in separate subfolders for each run
- Result Table & Alias -> You can enter an alternative name for each results table here, e.g. to give the tables in the export files more descriptive names
Click on Add Excel Service at the bottom right to complete the settings for the third-party service.

You will now see in the overview that you have created an Excel export as a third-party service for this task. You also have the option of creating several third-party services here in order to export the results tables to CSV files in parallel, for example.
CSV-Export
The CSV export is integrated in the same way as the Excel export. Click on the big +, select CSV and click on Choose & Configure. If desired, you can also adjust the export path (with subfolder), the data limit, the storage types and the aliases for the results tables here.
You must also specify the delimiter for the CSV export -> The default setting is also read from the Settings -> Third-Party Services -> CSV export.
You have the following setting options here:
- Comma ,
- Semicolon ;
- Hashtag #
- Pipe |
- Tab (like the Tab key on your keyboard)
Then click on Continue.
Completion
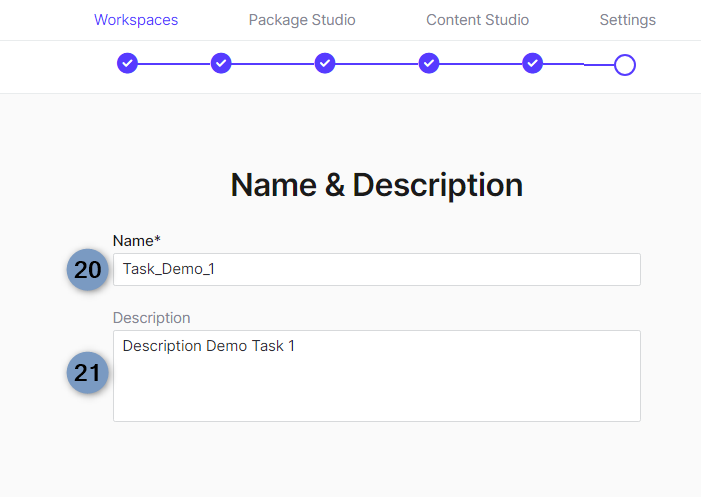
- Name -> Enter a name for the Task
- Description -> You can enter a description for the Task
Then click Finish at the bottom to complete the task creation.