Ejecutar AnalyticSuite
Creación de tareas
Las soluciones a posibles errores que pueden surgir al crear tareas se encuentran en este artículo
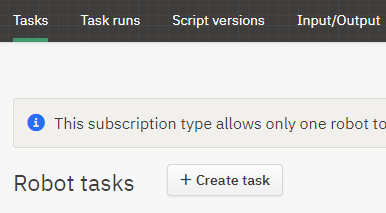
Para crear una tarea en su robot, debe cambiar a la pestaña Tareas. Se abrirá una ventana con una vista general de las tareas creadas.
Al hacer clic en el botón Crear tarea, aparecerá una ventana de entrada en la que usted debe introducir el nombre para su tarea.

Descargar datos
Este script forma parte de AnalyticSuite. Permite realizar únicamente la descarga de los datos para una selección de análisis. Las tablas brutas de SAP se almacenan en el servidor y pueden visualizarse en la pestaña Entrada/Salida. Posteriormente pueden realizarse distintas ejecuciones de análisis sobre esta base de datos preparada, sin que sea necesaria una descarga previa. Alternativamente, los análisis también pueden ejecutarse sin una descarga realizada por separado con anterioridad. Para ello, utilice el script de inicio Run AnalyticSuite que se describe a continuación.
Ejecutar AnalyticSuite
Este script inicia los análisis tras introducir los parámetros necesarios. Permite ejecutar los análisis ya sea sobre los datos previamente descargados (Script: Descargar datos) o realizar una descarga individual de los datos brutos para cada ejecución (Parámetro: Descargar datos). En este caso, los datos brutos se eliminan automáticamente tras una ejecución exitosa y solo permanecen los resultados.
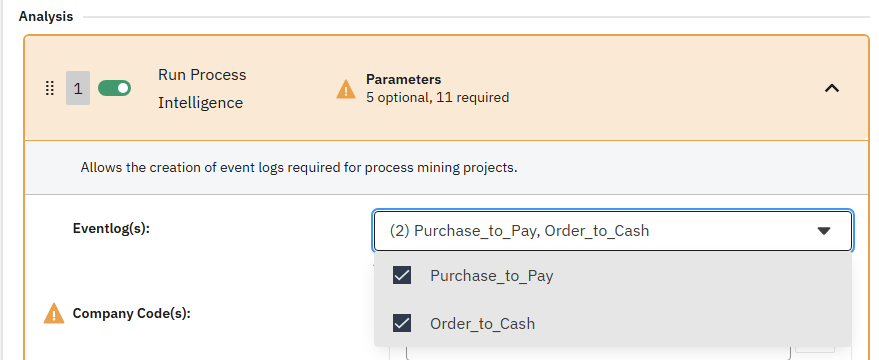
Ejecutar Process Intelligence
Este script es un script de inicio independiente que crea Event Logs para process mining. Si se activa Ejecutar Process Intelligence, algunas opciones cambian. No estarán disponibles las siguientes opciones:
- Áreas de análisis
- Pasos individuales de auditoría
- Cálculo del periodo de fechas
- Carga de resultados
En su lugar, puede seleccionar Eventlog(s):
Entrada de parámetros
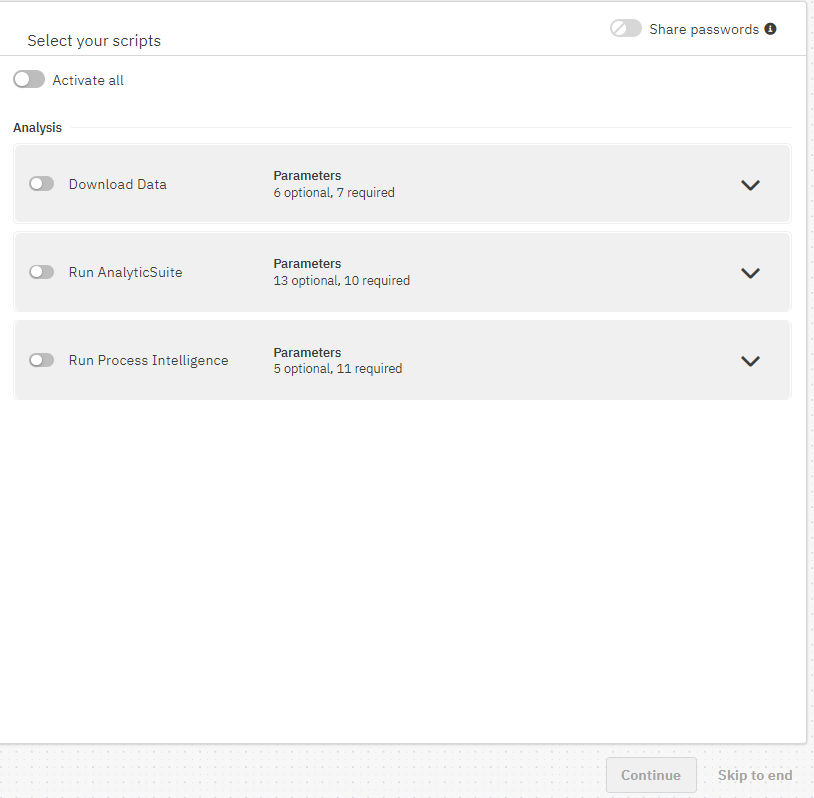
Ahora usted tiene la posibilidad de seleccionar todos los scripts de inicio o solo algunos de ellos. Los scripts contienen parámetros que pueden o deben completarse. Los campos obligatorios están marcados con un signo de exclamación. Al hacer clic en la flecha desplegable en el script de inicio correspondiente, se abre la lista de parámetros. Existen diferentes tipos de parámetros y, según el formato de los datos (lógico, numérico, carácter, fecha-hora), requiere una entrada distinta. Sin embargo, también es posible introducir varios valores para un mismo parámetro. Por ejemplo, existe un parámetro en el que se introducen los códigos de sociedad. Para ello, introduzca los códigos de sociedad de cuatro dígitos uno por uno y añádalos a la lista utilizando el símbolo más. Esto hace que solo se descarguen y/o analicen datos de estos códigos de sociedad.
A continuación se explica cada parámetro:

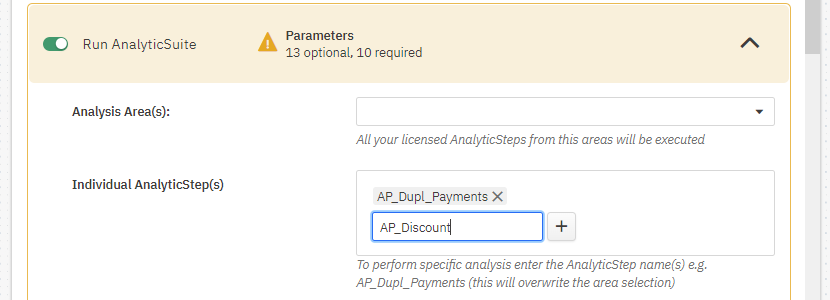
Área(s) de análisis
Lista de todas las áreas/módulos de dab:AnalyticSuite para ejecutar todos sus AnalyticSteps licenciados de los módulos seleccionados.
AnalyticStep(s) individuales
Para ejecutar uno o más análisis individualmente, introduzca el/los nombre(s) de AnalyticStep, por ejemplo, AP_Dupl_Payments. Esta entrada sobrescribirá la selección de Área(s) de análisis.
Tenga en cuenta que debe introducirse el nombre exacto del análisis.
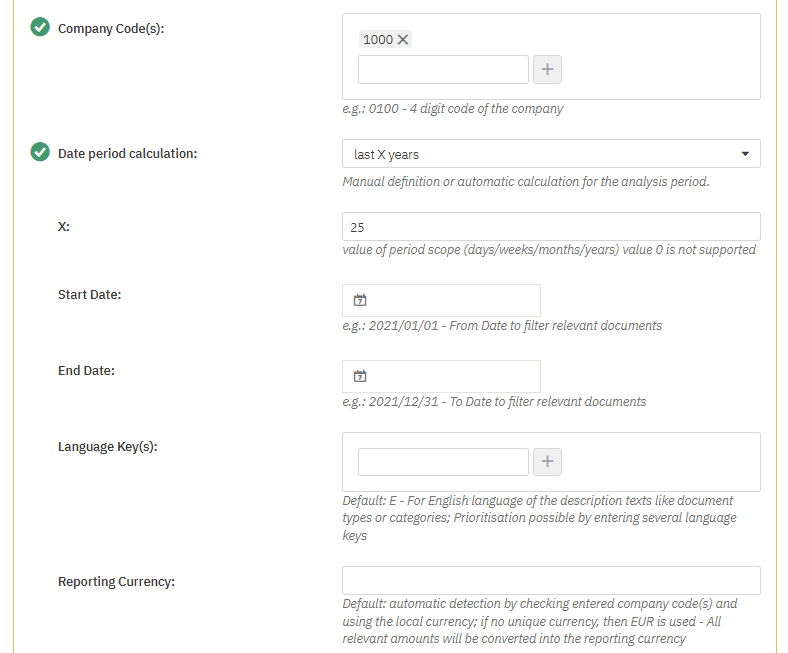
Código(s) de sociedad
Esto permite restringir la ejecución del análisis a códigos de sociedad específicos. Si introduce #ALLCC#, se analizarán todos los códigos de sociedad existentes. Con la entrada de #PRODCC# se examinan todos los códigos de sociedad productivos. (Tabla T001, Campo XPROD, Indicador: ¿código de sociedad productivo?)
Verifique primero cuántos códigos de sociedad hay en el sistema y si realmente todos son relevantes para la evaluación. Idealmente, seleccione solo los productivos. Un análisis de todos los códigos de sociedad conllevará tiempos de ejecución más largos y puede extraer más datos del sistema que los necesarios.
Cálculo del periodo de fechas
Este parámetro determina si el periodo de análisis / descarga de datos se especifica mediante una fecha de inicio y fin fija, o si debe calcularse automáticamente. Esto es necesario si los análisis deben ejecutarse de forma continua y el periodo de análisis debe desplazarse automáticamente (por ejemplo, análisis mensual ejecutado sobre los documentos de los últimos 12 meses).
| Parámetro | Descripción |
|---|---|
| Ninguno - usar fecha inicio/fin fija | No se realiza cálculo, sino que se utilizan los valores de fecha de los parámetros de inicio/fin. La entrada en el parámetro X se ignora. |
| últimos X días/semanas/meses/años | Cálculo de los valores de fecha a partir de hoy retroactivamente según la entrada en el parámetro X. Siempre se consideran únicamente unidades finalizadas completamente (p. ej. último mes completo). Se sobrescribe la entrada en los parámetros Fecha de inicio y Fecha de fin. |
Fecha de inicio y fin
El periodo de análisis, si no se debe realizar cálculo automático.
Clave(s) de idioma
Prioriza el idioma de los textos descriptivos. La priorización solo se realiza si se especifican varias claves de idioma. Si el campo no se rellena, el idioma predeterminado es E -> inglés.
Moneda de reporte
Para una mejor comparabilidad de los resultados, todos los valores relevantes se convierten en una moneda de reporte coherente.
Si evalúa datos con diferentes monedas de código de sociedad y no especifica la moneda de reporte, se usará EUR. Al evaluar un código de sociedad, la moneda de dicho código se utiliza como moneda de reporte.
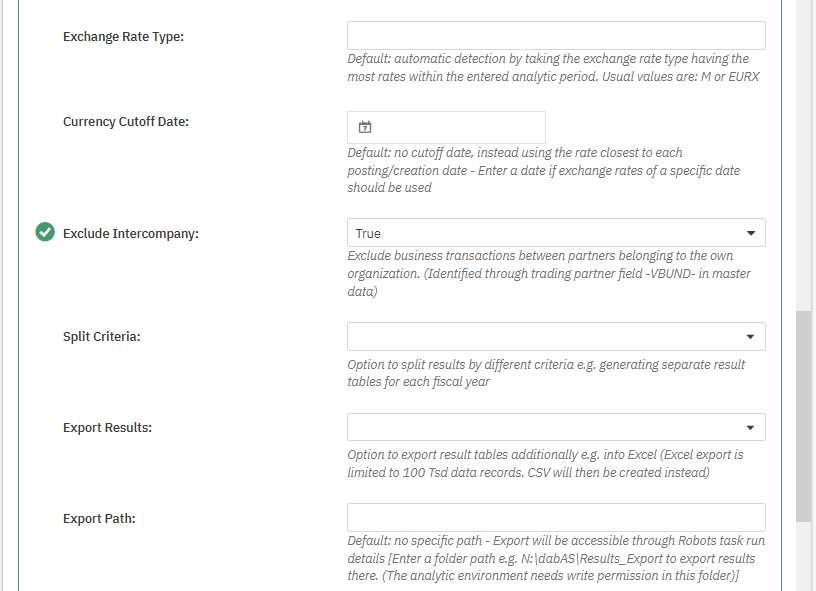
Tipo de tipo de cambio
Define el tipo de cambio de moneda. Normalmente se utiliza el tipo EURX para la conversión a EUR. Para todas las demás monedas, el tipo M. Si no se realiza ninguna entrada, se utiliza el tipo M.
Fecha de corte para el tipo de cambio
Si introduce una fecha, se empleará el tipo de cambio válido en esa fecha para la conversión de moneda. Si deja el campo vacío, se usará el tipo de cambio válido en la fecha del documento.
Excluir sociedades intercompañía
Se excluyen del resultado los socios que están marcados como internos en los datos maestros. Para ello se utiliza el campo SAP VBUND número de sociedad asociada.

Criterio de división
Además de la tabla de detalle, que contiene todos los resultados, estos pueden dividirse en una tabla individual para cada código de sociedad y/o ejercicio fiscal.
Exportar resultados
Posibilidad de exportar las tablas de resultados adicionalmente a un archivo (Excel o CSV). La exportación Excel está limitada a 100 mil registros por tabla. En su lugar, se generará un archivo CSV.
Ruta de exportación
Si la exportación debe realizarse a una ruta específica, puede introducirla aquí.
Alternativamente, encontrará los archivos en la salida de resultados de la ejecución de la tarea. La ruta debe introducirse como sigue: N:\dabAS\Results_Export
El entorno de análisis o el servicio requieren permisos de escritura para esta carpeta.
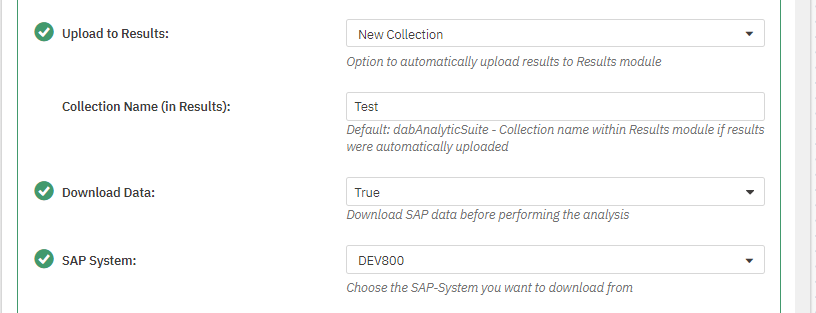
Cargar a Resultados
Opción para cargar automáticamente los resultados en la aplicación de resultados. Qué columnas deben cargarse del resultado puede configurarse en el archivo TF_Import.xlsx.
| Variable | Descripción |
|---|---|
| Sin carga | no se cargan resultados a la aplicación de resultados |
| Nueva colección | nueva colección para esta ejecución |
| Tablas existentes (Añadir) | Se cargan resultados a una tabla existente, según se configura en TF_Import.xlsx. La tabla existente permanece y se amplía con las nuevas entradas. Usando una clave principal, también pueden actualizarse registros ya existentes. |
| Tablas existentes (Sobrescribir) | Se cargan resultados a una tabla existente, según se configura en TF_Import.xlsx. Esto sobrescribirá la tabla existente. |
Nombre de la colección (en Resultados)
Si los resultados deben cargarse en la aplicación de resultados, aquí puede asignar un nombre individual para la colección.
Si no introduce nada, la colección será nombrada dabAnalyticSuite_[timestamp]. Si el sello de tiempo debe añadirse o no, puede configurarse en el script.
Descargar datos
Esto determina si debe realizarse también una descarga de datos desde SAP con esta tarea o si deben utilizarse los datos descargados previamente.
SAP-System
Si ha configurado varios sistemas, aquí seleccione el sistema relevante para esta ejecución.
Usuario SAP y Contraseña SAP
Para iniciar sesión en el SAP System y exportar las tablas necesarias para la evaluación. Dependiendo de la implementación, aquí se autorizó su propio usuario para el acceso, o se creó un usuario separado.
Descargar Monitor
Opción para cargar el estado de la descarga en la aplicación de resultados y registrar el progreso.
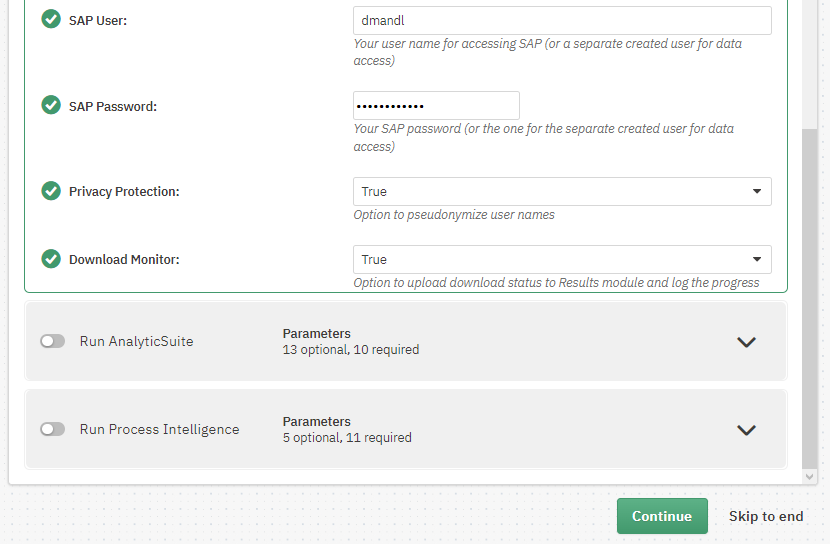
Parámetros de descarga de Descargar datos y Ejecutar AnalyticSuite: Si decide ejecutar la descarga de datos de SAP y AnalyticSuite por separado, puede ejecutar el script de inicio Descargar datos. Sin embargo, en el script de inicio Ejecutar AnalyticSuite, deberá volver a introducir las credenciales SAP, Privacy Protection y Descargar Monitor, y estos detalles se ignorarán si establece el parámetro Descargar datos en Falso. Estos parámetros solo son relevantes si la descarga se ejecuta junto con la ejecución del análisis o el parámetro Descargar datos está en Verdadero.
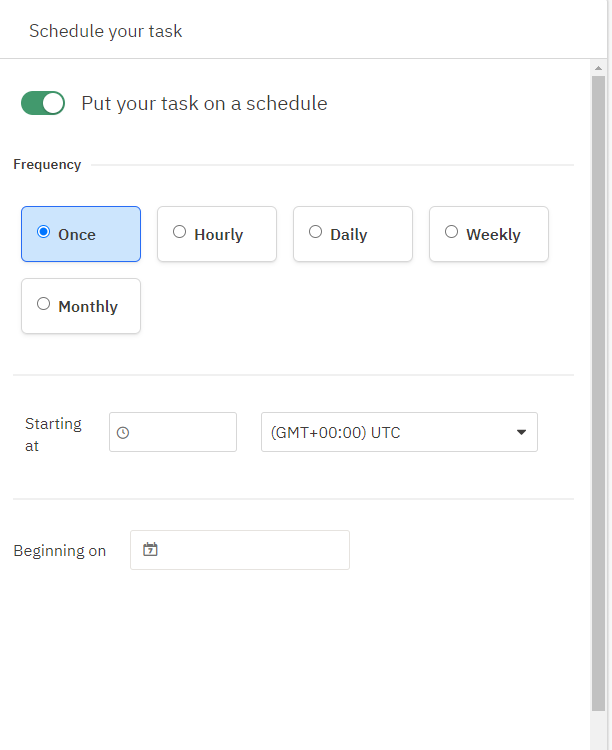
Programación de tareas
A continuación, puede definir una programación. Aquí puede especificar la frecuencia, la hora y la fecha a partir de la cual debe ejecutarse la tarea. Es posible ejecutar la tarea una sola vez o varias veces.
Las ejecuciones múltiples incluyen:
- Cada hora: el intervalo más corto posible es cada 10 minutos
- Diario: se puede introducir un valor de 1 a 31
- Semanal: se puede seleccionar un día concreto de la semana y el intervalo debe estar entre 1 y 12
- Mensual: se puede seleccionar un día concreto o el último día de un mes en un intervalo entre 1 y 12
Ejecución múltiple Si desea una ejecución continua de AnalyticSuite con una de las configuraciones mencionadas en Programación de tareas, utilice el cálculo del periodo de análisis/descarga (Parámetro: Cálculo del periodo de fechas + X).
Si deja el interruptor desactivado, la tarea solo podrá ejecutarse manualmente (más información sobre esto a continuación).
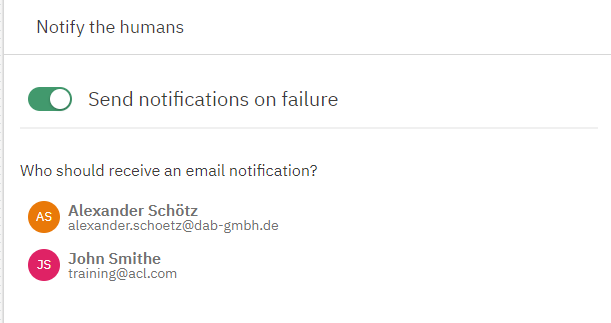
Dado que un script puede contener errores, es posible notificar a una persona haciendo clic en Siguiente. Seleccione a la(s) persona(s) que deben ser contactadas por correo electrónico si la ejecución analítica falla.
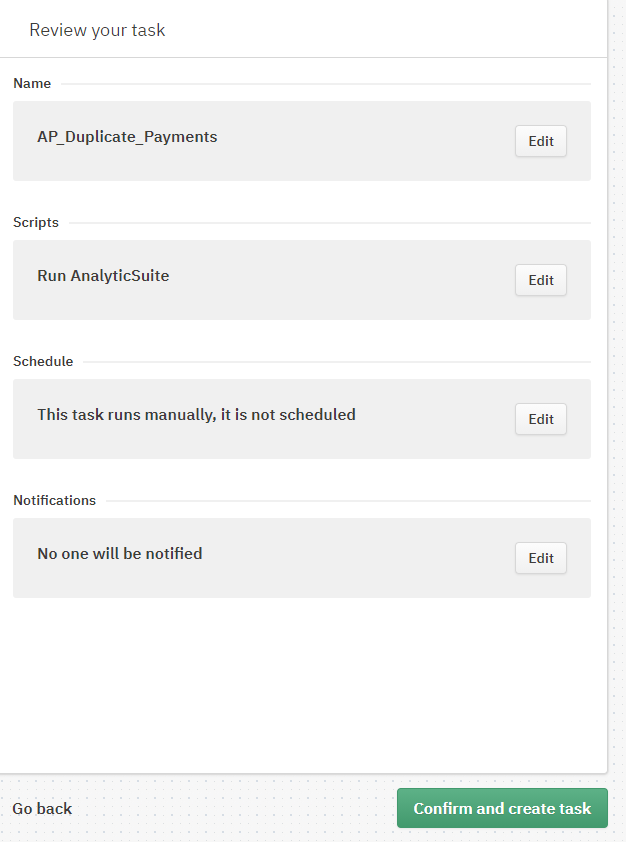
Por último, tiene la posibilidad de revisar sus entradas anteriores y modificarlas si es necesario. Si todo es correcto, pulse Confirmar y crear tarea.
Ejecución de la tarea
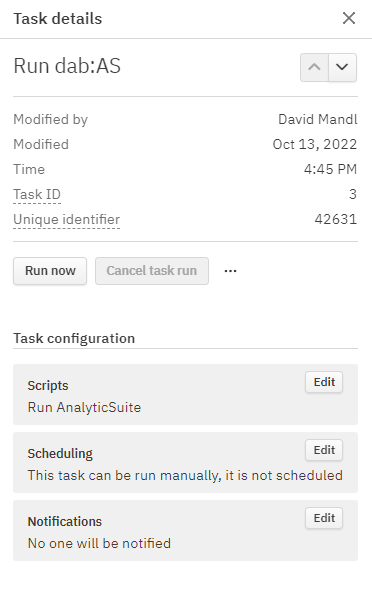
Independientemente de si se ha definido una programación o no, una tarea también puede ejecutarse manualmente. Para ello, haga clic en la tarea deseada. Aparecerá una ventana a la derecha, con información sobre la tarea correspondiente.
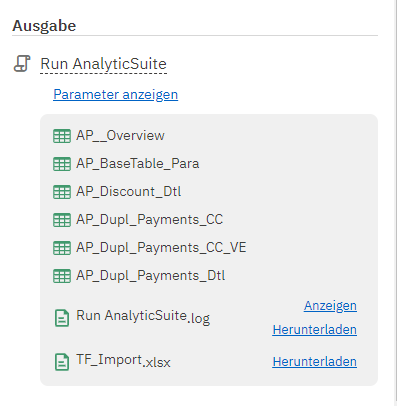
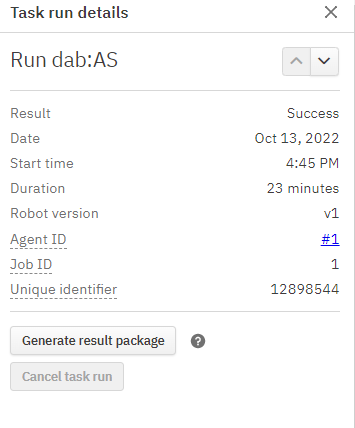
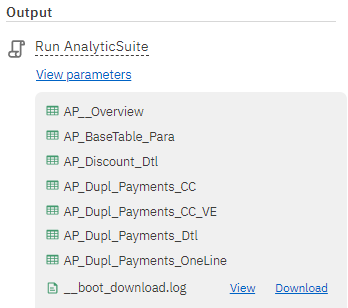
Aquí encontrará un botón Ejecutar ahora. Al hacer clic en este botón, el estado de la Tarea cambia a En cola y luego a En progreso. También es posible cancelar el proceso haciendo clic en Cancelar ejecución de la tarea. Si la ejecución fue exitosa, usted tiene la posibilidad de ver los resultados haciendo clic en Ver últimos resultados y generar y descargar un paquete de resultados (archivo ZIP).

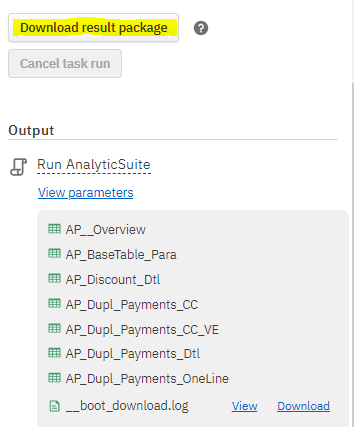
El archivo ZIP descargado debe descomprimirse antes de abrirlo en ACL Analytics. Allí encontrará nuevamente las tablas de resultados, que ya se mostraron junto a los resultados en el robot. Es posible que se le pida que introduzca su contraseña de Windows al intentar abrir una de las tablas en ACL.

Si la ejecución falla, usted tiene la posibilidad de abrir el archivo de registro (que tiene exactamente el mismo nombre que el robot) haciendo clic en Mostrar últimos resultados. En el archivo de registro puede utilizar Ctrl+F para buscar el término failed, o desplazarse hacia abajo hasta encontrar una X roja.