Detail Section
 Updated 3 months ago
by
Stephanie Krenz
Updated 3 months ago
by
Stephanie Krenz
Details for Tables
Once you have selected a table in the left section, the following options are available in the details section:
General
- Table-Name: SAP table name - cannot be changed
- Alias: can be changed at will and controls the subsequent table name in the database
- Strategy
- Merge: attempts to link new results with existing results
- Overwrite: deletes existing results and saves the new ones
- Append: appends the new results to the existing ones
- Layout: Specially designed for tables where the user does not have permissions per se
Fields
- Toggle Selection: select either all or no fields other than the primary keys by clicking on this button
- Magnifier: search for a specific field
- three lines: sort fields alphabetically (including key fields), sort by selection, sort by field description or field length - clicking Default restores the SAP table's default sorting.
- Refresh Fields: refresh the view
Filters
- Plus +: you can assign an existing filter using the + on the right
- Square with arrow (only useful if the filter assignment has been created): redirects you to the filter (as if you would click on this filter in the left area)
- Filtername: select an existing filter in the left drop-down menu (which was created in the left area)
- Field: select the field to be filtered in the right-hand drop-down menu
- Bucket: you can use the bucket to delete this filter assignment to the field (the original filter is retained)
Dependency
- Plus +: you can add a dependency to an existing repository using the + on the right
- Square with arrow (only useful if the repository has been created): redirects you to the repository (as if you were to click on this repository in the left pane)
- Repository: select an existing repository from the drop-down menu (which was created in the left-hand area)
- Gear: change the type of dependency
- Edit Dependency: *Repositoryname*
- Dependency Type
- In: Query with IN-Statement, e.g. BELNR IN (1,2,3,4,...)
- Between: Query with Between-Statement, e.g. BELNR Between 1 and 10
- Optimized: Combination of IN- and Between-Statements, e.g. BELNR between 1 and 5 AND BELNR NOT IN (1,2,3,5)
- Custom Mapping: if active, the link between the elements themselves can be selected. Works if the fields here have the same name as in the table (case-sensitive).
- Bucket: you can use the bucket to delete this dependency for the repository (the original repository is retained)
Target Repositories
- Plus +: you can add new target repositories via the + on the right
- Square with arrow (only makes sense once the assignment has been created): redirects you to the repository (as if you were to click on this repository in the left pane)
- Gear: opens as soon as you have selected a repository, can also be opened via the icon to the left of the bucket icon
- Edit Target Source: *Repositoryname*
- Custom Mapping: if active, the link between the elements themselves can be selected. Works if the fields here have the same name as in the table (case-sensitive).
- Bucket: you can delete this assignment via the bucket (the original repository is retained)
Details for virtual Tables
With one exception, the structure here is the same as in the tables.
In this view, only the Strategy is absent in the General section.
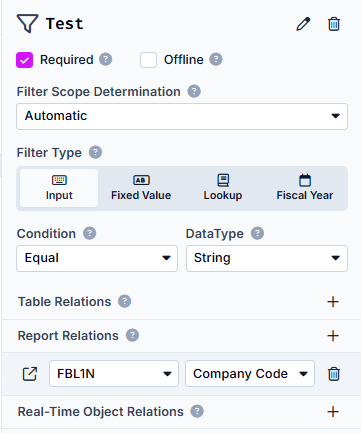
Details for Filters
If you use one of the following names for your filter, the type is automatically set to Lookup:
Fiscal Year, Companycode, Company Code, Time Period
General
- Filtername: freely selected filter name
- Pen: change the name of the filter
- Bin: delete the filter
- Required: active (Filter is required), inactive (Filter is optional)
- Offline: filter is only applied in dab Nexus, not directly in the SAP tables (ensures better extraction performance for very large SAP tables or for searches on table fields without indexing)
- (Filter)Type
- Input: user enters the value
- Fixed Value: value is set in the Package
- Lookup: it selects values from SAP during task creation and provides help with valid values
- Fiscal Year: enter a fiscal year when creating the task, or select one depending on its schedule
- Condition
Condition | Description | Example |
Equal | Both values are equal | 100 = 100 |
Not Equal | Both values are not equal | 100 <> 99 |
Greater | One value is greater than the other | 100 > 99 |
Greater Equal | One value is greater than or equal to the other | 100 >= 99/100 |
Less | One value is less (smaller) than the other | 99 < 100 |
Less Equal | One value is less than or equal to the other | 99/100 <= 100 |
Like | One value contains parts of the other | %est is contained in Test |
Not Like | One value doesn't contain parts of the other | %ame is not contained in Test |
Between | A value in a certain range | 5 is between 3 and 7 |
In | One value exists in a series of other values | DE exists in the series 'DE, EN, IT, FR' |
Not In | A value doesn't exist in a series of other values | DE doesn't exist in the series 'EN, IT, FR' |
Empty | A value (Character String) must be emtpy | Value = ''. |
Not Empty | A value (Character String) must be filled | Value = 'Here is a text'. |
Table Relations
The links between (virtual) tables and this filter are displayed here.
- Plus +: you can add a new link using the + on the right
- Square with arrow: redirects you to the (virtual) table
- Bucket: you can delete the link to the (virtual) table via the bucket
Report Relations
The links between reports and this filter are displayed here.
- Plus +: add a new link by clicking the + on the right
- Square with an arrow: redirects you to the corresponding (virtual) table
- Bucket: delete the link to the (virtual) table
Real-Time Object Relations
The links between Real-Time Objects and this filter are displayed here
- Plus +: Enter a name for your Real-Time Object
- Click on the Real-Time Object to edit and add values
- Bucket: delete the Real-Time Object
Details for Repositories
- Repository name: set a name for the repository
- Pen: the name of the repository can be changed
- Bucket: delete the repository
Fields
Define which fields should be added to the repository.
- Plus +: you can add a new filter using the + on the right
- Bucket: you can delete the link to the column via the bucket
Source-Tables
The corresponding table for the repository can be stored here.
- Plus +: you can add a new filter using the + on the right
- Square with arrow: redirects you to the (virtual) table
- Gear: mapping of the Table- & Repository-fields can be adjusted
- Custom Mapping: if enabled, the fields below can be mapped manually
- Bucket: you can delete the link to the column via the bucket
Target-Tables
Repository collects values and then uses them to limit the values in the other tables accordingly.
- Plus +: you can add a new filter using the + on the right
- Square with arrow: redirects you to the (virtual) table
- Gear:
- Dependency Type
- In: Query with IN-statement, e.g. BELNR IN (1,2,3,4,...)
- Between: query with Between-statement, e.g. BELNR Between 1 and 10
- Optimized: combination from IN- and Between-statements, e.g. BELNR between 1 and 5 AND BELNR NOT IN (1,2,3,5)
- Custom Mapping: indicates whether fields must be linked manually or not
- Dependency Type
- Bucket: you can delete the link to the column via the bucket
Details for Real-Time Objects
- Name of the Real-Time Object: set a name for the Real-Time Object
- Pen: name can be changed
- Bucket: delete the Real-Time Object
Details for Reports
Only reports that have a tabular output can be used.
You have various options in the detail area for your reports. These are explained below:
General
- Report Name: name of the added report from your selected SAP system, cannot be changed
- Alias: can be changed as required and controls the later table name in the database
Filters
This area changes depending on whether the report could be found or not.
- No Filter configured: Report could be found, but no filter has been created yet
- No Parameters available: Report could not be found, therefore no fields for filtering are available here
In our example, we create the Comments filter (General: Fixed Value, String, Like / Values: Z_Kommentar: Test % / Report Relations: Report -> RS_ABAP_SOURCE_SCAN and Field -> Comment):
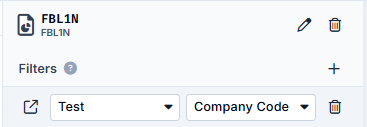
In the detail area of the report, the whole thing looks like this:
This setting causes the entire ABAP code of the SAP system to be scanned and all comment lines beginning with Z_Kommentar: Test are found.