Tasks
 Updated 3 months ago
by
Stephanie Krenz
Updated 3 months ago
by
Stephanie Krenz
You can create multiple Tasks in a Workspace to perform different analyses. You can schedule these Tasks to run automatically once, hourly, daily, weekly, monthly or in real time.
Task Creation
Click on Workspace and then on + Task.
Select the Type of Task you want to create. Each Task-Type is explained in detail in the following sections.
If the parameters are not labelled (Optional), then this is a required field.
When using Initial and Delta Variant, please note that Initial Variant is only used during the first run and Delta Variant is used during all subsequent runs.
For cloned tasks, you can navigate directly to the connection settings, e.g. for the SAP system. To do this, click on the respective step on the left.
Analytic Task
Based on an Analyitc Group with defined parameters, data is extracted from the SAP system and written to the SQL database. The Analysis is performed afterwards.
1. Name & Description
- Task Name: enter a name
- Description: optionally, you can enter a description
2. SAP System
Choose a SAP System
- SAP System: select a SAP system from the list
- Parallel Extractions: define how many Slots the extraction can or may use in parallel in this SAP system (explained at the bottom)
- Status: Connected or Failed
Data Masking - Disable Data Masking: SAP data is extracted without applying any masking
- Pseudonymize: replaces values with consistent hashes using salted hashing
Hashing means turning data into a one-way string of characters that cannot be reversed. A salt is a random piece of data added to the data before hashing. This ensures that even identical data produce different hashes, making attacks much harder and improving security.
3. Data Strategy
Select an existing Data Strategy from the list.
4. SQL Server
- SQL Server: select an SQL Connection from the dropdown list
- Schema for Extracted Data: displays and explains the schema based on the selected Data Strategy
- Schema for Results Data: displays and explains the schema based on the selected Data Strategy
Settings - Data Transformation
- Use SAP Primary Keys: uses the primary keys from SAP such as MANDT or BUKRS
- Use NEXUS_ID: automatically adds the NEXUS_ID field to the table layout
- Both - Start & End, Start, End or None: defines whether and where to remove spaces from field values
5. Schedule
Start Time
- Start Now: Task starts as soon as it is completed
- Start Later: Task starts at the selected time (date, time zone, day and time slot)
Updates
- No Updates needed: no re-scheduling of the task
- Regular Update needed: Task is scheduled to run repeatedly (You can set the time zone and time if you have selected the Start Later option under Start Time. Otherwise, your time zone and current time will be set).
Run Interval | Possible Settings | Description |
Hourly | 1 to 23 hours | Specify the hourly interval at which the Task should be executed repeatedly |
Daily | 1 to 6 days | Specify the daily interval at which the Task should be executed repeatedly |
Weekly | Weekday selection 1 to 7 days | Specify on which days of the week the Task should be executed repeatedly |
Monthly | 1 to 28 Days, last day 1 to 12 months | Specify on which days of the month the Task should be executed repeatedly (alternatively or additionally, last day of the month can also be selected) |
6. Analytic Group
- Analytic Group: use the drop down menu to select an existing Analytic Group
- Analytic Steps: displays the first few Analytic Steps
7. Parameters
First, select your preferred language. The fallback language will only be used if a description is not available in your preferred language.
Next, choose a company code by dragging it into the Selected Company Codes section.
- Analytic Time Period: Define start and end dates
- Fiscal Year: Select the fiscal year
- Extraction Time Period: Time period during which the data is filtered
- Analytic Closing Date: Relevant for certain analytics where a closing date is required
- Currency Conversion Date: Choose the date for currency conversion
- Reporting Currency: Your reporting currency
- Exchange Rate Type: Set the exchange rate type
- Exclude Intercompany: Include or exclude intercompany transactions
8. Third-Party Services
Add Excel
- Export Path (Subfolder): enter the path where you want to save the Excel file
- Test Path: test whether the specified path is correct and accessible
- Copy Full Path: copy the file path to the clipboard
- Export Mode:
- File per Result Table: for each results table, a separate Excel file is created and saved
- Sheet per Result Table in one File: a separate worksheet (sheet) will be created in an Excel file for each table of results (all tables of results in one Excel file)
- Data Limit: defines the maximum number of records per file - if this is exceeded, another Excel file is automatically created
- Enable Thousands Separators: if this option is enabled, a thousand separator is inserted
- Add Header: when enabled, the column names are written in the first row of the Excel sheet
- Create Subfolder per Run: when executed repeatedly, a separate subfolder is created for each run
- Result Table & Alias: for each result table, an alias (alternative name) can be entered
Click Add Excel Service to complete the configuration.
Add CSV
- Export Path (Subfolder): enter the path where you want to save the CSV file
- Test Path: test whether the specified path is correct and accessible
- Copy Full Path: copy the file path to the clipboard
- Delimiter:
- Comma ,
- Tab (like the Tab-key on your keyboard)
- Pipe |
- Hashtag #
- Semikolon ;
- Data Limit: specifies the maximum number of records per file. If this limit is exceeded, another CSV file is automatically created (enter 0 to write all entries to one file).
- Add Header: when enabled, the column names are written in the first row of the CSV
- Create Subfolder per Run: when executed repeatedly, a separate subfolder is created for each run
- Result Table & Alias: for each result table, an alias (alternative name) can be entered
Click Add CSV Service to complete the configuration.
9. Review
In the Review, all the selected settings and parameters are displayed again.
If you want to change any of the settings, simply click on the entry. You will automatically return to this section.
If everything is OK, click on Create Task.
Extraction Task
A user-defined Extraction Package, created using the Package Studio, is used to extract the data from the SAP system. This data is stored in the SQL database. The data is not analysed.
1. Name & Description
- Task Name: enter a name
- Description: optionally, you can enter a description
2. SAP System
Choose a SAP System
- SAP System: select a SAP system from the list
- Parallel Extractions: define how many Slots the extraction can or may use in parallel in this SAP system
- Status: Connected or Failed
- Bucket: Remove this connection and select another one
- + Add SAP System: here you can set up more than one SAP connection (Multi-SAP extraction)
Data Masking
- Disable Data Masking: SAP data is extracted without applying any masking
- Anonymise: replaces field values with XXXXXXXXXXXXXX
- Pseudonymize: replaces values with consistent hashes using salted hashing
3. Data Strategy
Select an existing Data Strategy from the list.
4. SQL Server
- SQL Server: select an SQL Connection from dropdown list
- Schema for Extracted Data: displays and explains the schema based on the selected Data Strategy
Table Layout
- With Field Prefix: puts the table name in front of the column name
- Without Field Prefix: sets only column names
Settings - Data Transformation
- Use SAP Primary Keys: uses the primary keys from SAP such as MANDT or BUKRS
- Use NEXUS_ID: automatically adds the NEXUS_ID field to the table layout
- Both - Start & End, Start, End or None: defines whether and where to remove spaces from field values
5. Schedule
Start Time
- Start Now: Task starts as soon as it is completed
- Start Later: Task starts at the selected time (date, time zone, day and time slot)
Updates
- No Updates needed: no re-scheduling of the task
- Regular Update needed: Task is scheduled to run repeatedly (You can set the time zone and time if you have selected the Start Later option under Start Time. Otherwise, your time zone and current time will be set).
Run Interval | Possible Settings | Description |
Hourly | 1 to 23 hours | Specify the hourly interval at which the Task should be executed repeatedly |
Daily | 1 to 6 days | Specify the daily interval at which the Task should be executed repeatedly |
Weekly | Weekday selection 1 to 7 days | Specify on which days of the week the Task should be executed repeatedly |
Monthly | 1 to 28 Days, last day 1 to 12 months | Specify on which days of the month the Task should be executed repeatedly (alternatively or additionally, last day of the month can also be selected) |
Real-Time | Without delay or Delay from 1 to 59 minutes | Real-time without delay means that a new run is started as soon as the last run has been successfully completed. If a delay is specified, this time will be waited after the previous run has been successfully completed before the next run is automatically started. |
6. Extraction Package
The Use Initial & Delta Variant checkbox only appears if the task has been scheduled repeatedly and the Data Strategy is appropriate. Please refer to the information below the checkbox in dab Nexus.
Select an Extraction Package from the drop-down menu.
First, set the Initial Variant, and if possible, the Delta Variant.
You can then add further extraction packages via + Add Package (Multi-Package extraction), after which dab Nexus will automatically attempt to merge them. If the selected packages cannot be merged, a corresponding message will appear.
The status indicates whether the package can be used.
Click the button next to it to open the package directly in Package Studio.
Click the bin button to remove this package from the selection.
7. Parameters
General
Fill in the required parameters according to the selected extraction package.
SAP System
- Preferred Language: select the preferred language
- Fallback Language: optionally, you can select a fallback language if descriptions are not available in your preferred language.
Company Code
- Available Company Code: displays all company codes in the selected SAP system
- Selected Company Codes: lists all company codes for which data is to be extracted
8. Third-Party Services
Add CSV
- Export Path (Subfolder): enter the path where you want to save the CSV file
- Test Path: test whether the specified path is correct and accessible
- Copy Full Path: copy the file path to the clipboard
- Delimiter:
- Comma ,
- Tab (like the Tab-key on your keyboard)
- Pipe |
- Hashtag #
- Semikolon ;
- Data Limit: specifies the maximum number of records per file. If this limit is exceeded, another CSV file is automatically created (enter 0 to write all entries to one file).
- Add Header: when enabled, the column names are written in the first row of the CSV
- Create Subfolder per Run: when executed repeatedly, a separate subfolder is created for each run
- Result Table & Alias: for each result table, an alias (alternative name) can be entered
Click Add CSV Service to complete the configuration.
9. Review
In the Review, all the selected settings and parameters are displayed again.
If you want to change any of the settings, simply click on the entry. You will automatically return to this section.
If everything is OK, click on Create Task.
Replication Task
Data extracted from SAP is transferred to the selected environment under Connection. Unlike the Analytic or Extraction task, it is not stored directly on the SQL server.
1. Name & Description
- Task Name: enter a name
- Description: optionally, you can enter a description
2. SAP System
Choose a SAP System
- SAP System: select a SAP system from the list
- Parallel Extractions: define how many Slots the extraction can or may use in parallel in this SAP system.
- Status: Connected or Failed
- Bucket: Remove this connection and select another one
- + Add SAP System: here you can set up more than one SAP connection (Multi-SAP extraction)
Data Masking
- Disable Data Masking: SAP data is extracted without applying any masking
- Anonymise: replaces field values with XXXXXXXXXXXXXX
- Pseudonymize: replaces values with consistent hashes using salted hashing
3. Connection
Connection Type
- Fabric Mirrored Database: select an existing connection to Fabric Mirror via the drop-down menu
- Fabric Lakehouse: choose a Lakehouse to connect to from the list
- Snowflake: select a Snowflake connection and database schema
- Azure Data Lake Storage: select an ADLS connection
Data Strategy
- Merge: the extracted data is merged with the existing data (this option may not be available for the selected ADLS connection)
- Overwrite: deletes existing data records at the start of extraction, before new data is entered (this option may not be available for the selected ADLS connection)
Settings - Data Transformation
- Use SAP Primary Keys: uses the primary keys from SAP such as MANDT or BUKRS
- Use NEXUS_ID: automatically adds the NEXUS_ID field to the table layout
- Both - Start & End, Start, End or None: defines whether and where to remove spaces from field values
4. Schedule
Start Time
- Start Now: Task starts as soon as it is completed
- Start Later: Task starts at the selected time (date, time with time zone, day and time slot)
Updates
- No Updates needed: no re-scheduling of the task
- Regular Update needed: Task is scheduled to run repeatedly (You can set the time zone and time if you have selected the Start Later option under Start Time. Otherwise, your time zone and current time will be set).
Run Interval | Possible Settings | Description |
Hourly | 1 to 23 hours | Specify the hourly interval at which the Task should be executed repeatedly |
Daily | 1 to 6 days | Specify the daily interval at which the Task should be executed repeatedly |
Weekly | Weekday selection 1 to 7 days | Specify on which days of the week the Task should be executed repeatedly |
Monthly | 1 to 28 Days, last day 1 to 12 months | Specify on which days of the month the Task should be executed repeatedly (alternatively or additionally, last day of the month can also be selected) |
Real-Time | Without delay or Delay from 1 to 59 minutes | Real-time without delay means that a new run is started as soon as the last run has been successfully completed. If a delay is specified, this time will be waited after the previous run has been successfully completed before the next run is automatically started. |
5. Extraction Package
The Use Initial & Delta Variant checkbox only appears if the task has been scheduled repeatedly and the Data Strategy is appropriate. Please refer to the information below the checkbox in dab Nexus.
Select an Extraction Package from the drop-down menu.
First, set the Initial Variant, and if possible, the Delta Variant.
You can then add further extraction packages via + Add Package (Multi-Package extraction), after which dab Nexus will automatically attempt to merge them. If the selected packages cannot be merged, a corresponding message will appear.
The status indicates whether the package can be used.
Click the button next to it to open the package directly in Package Studio.
Click the bin button to remove this package from the selection.
6. Parameters
Fill in the required parameters in this section.
7. Review
In the Review, all the selected settings and parameters are displayed again.
If you want to change any of the settings, simply click on the entry. You will automatically return to this section.
If everything is OK, click on Create Task.
Task Changes
You can partially modify a Task after it has been created.
Change or (De)activate Schedule
This is how it works:
- Search Task: you can recognise repeatedly scheduled tasks in the overview by their status (Active/Inactive), the Next Run display and the number of Total Runs (more than 1 run) – then click on the task to open it
- Adjustment: switch to the Configuration tab and, if necessary, to Schedule & Status
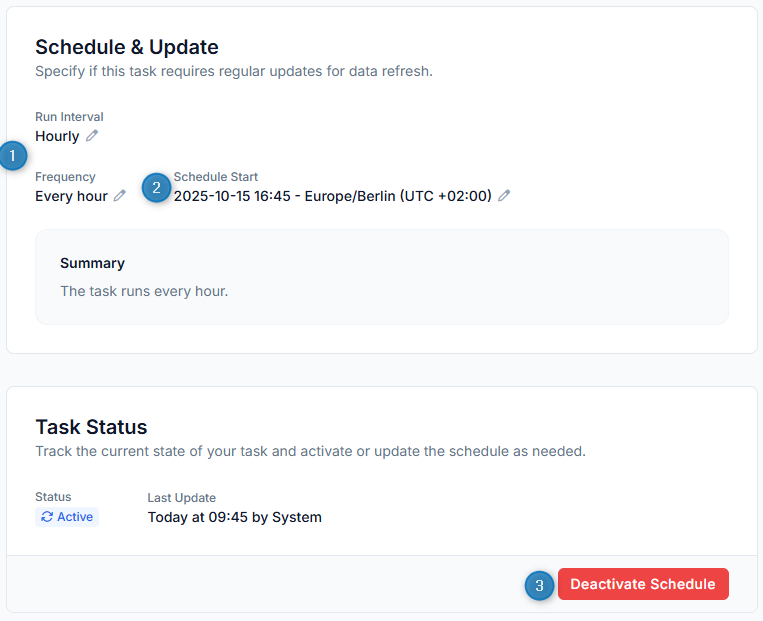
- Run Interval & Frequency: in the pop-up, you can select an option from Hourly, Daily, Weekly or Monthly, and also adjust the frequency
- Schedule Start: here you can change the start date and time as well as the time zone
- Deactivate Schedule (red) or Activate Schedule (green): you can use this button to pause the repeated execution - the task will then no longer be executed until you reactivate it
Change the number of Slots per SAP system
The number of Slots per SAP system determines how many parallel requests dab Nexus can open to this SAP system in order to extract data.
When you create the SAP Connection, you can define the maximum number of System Slots that this connection may use – this also depends on your licence.
The change to the System Slots is described below:
- Search and open the Task
- Adjustment: select the tab Configuration and go to SAP System
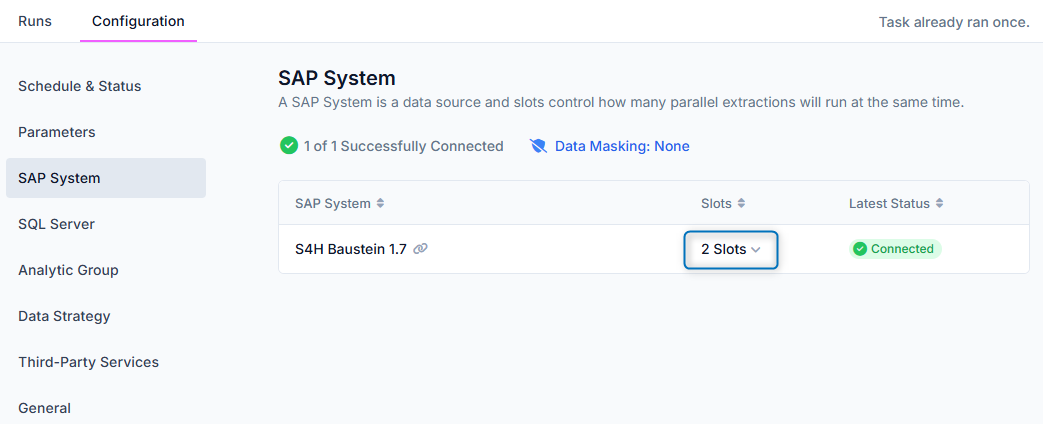
Click on the small arrow next to the number of slots to select a different number from the drop-down menu. If the task is scheduled to run repeatedly, this new number of slots will be used the next time it runs.