Analytic Groups

Analytic Groups play a vital role in organizing Analytic Tasks and their executions within dab Nexus. They enable the creation of custom groupings of analyses, making it easier to manage and access them efficiently. This flexibility allows you to tailor analytical processes to meet the unique needs and goals of your organization.
An Analytic Group, along with its associated analyses, is a prerequisite for creating analytic tasks within the Workspaces area of dab Nexus. This setup ensures that all necessary analyses are available and ready for execution. Additionally, Analytic Groups make it easy to share analysis packages with other users, enabling seamless collaboration on data-driven projects.
You can create an Analytic Group by clicking on Content Studio > Analytic Groups and on + Analytic Group:

Analytic Steps
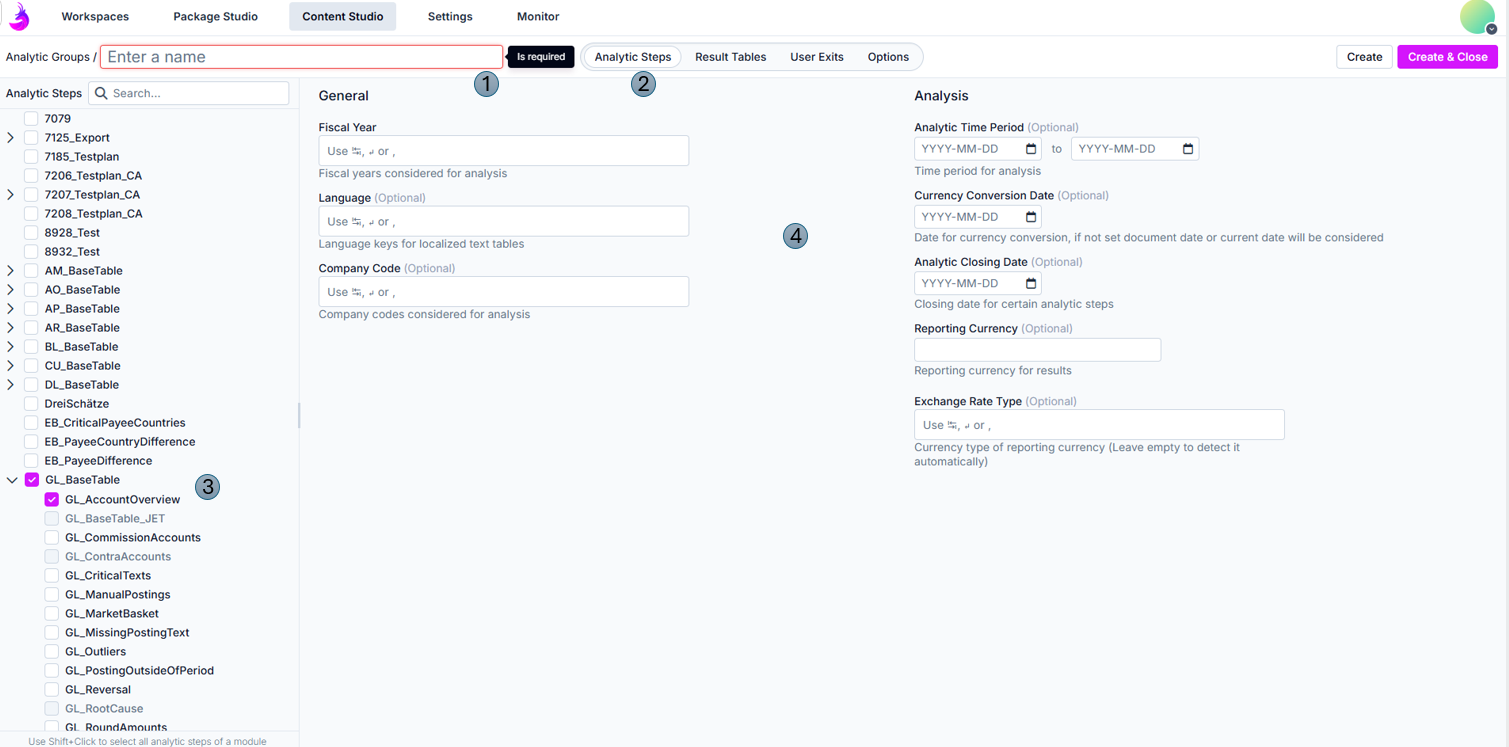
- Enter a name for the Analytic Group (Is required)
- Tab Analytic Step: below is a list of the various analytical steps you can configure. This article provides step-by-step guidance on how to configure each analytical stage.
- Analytic Steps: Choose the analyses you want to include in your group — you can add as many as you need.
Hold the Shift-key on your keyboard and left-click on a desired checkbox to select or deselect all analysis steps of a module.
 | The BaseTable and all Analytic Steps are selected |
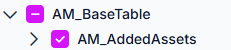 | One or more Analytic steps are selected, but not the AM_BaseTable (indicated by the - sign) |
- Parameter (Optional): you can set default values for individual parameters which is ideal for task settings that rarely or never change. Of course, these defaults can be adjusted during task creation if needed.
Result Tables
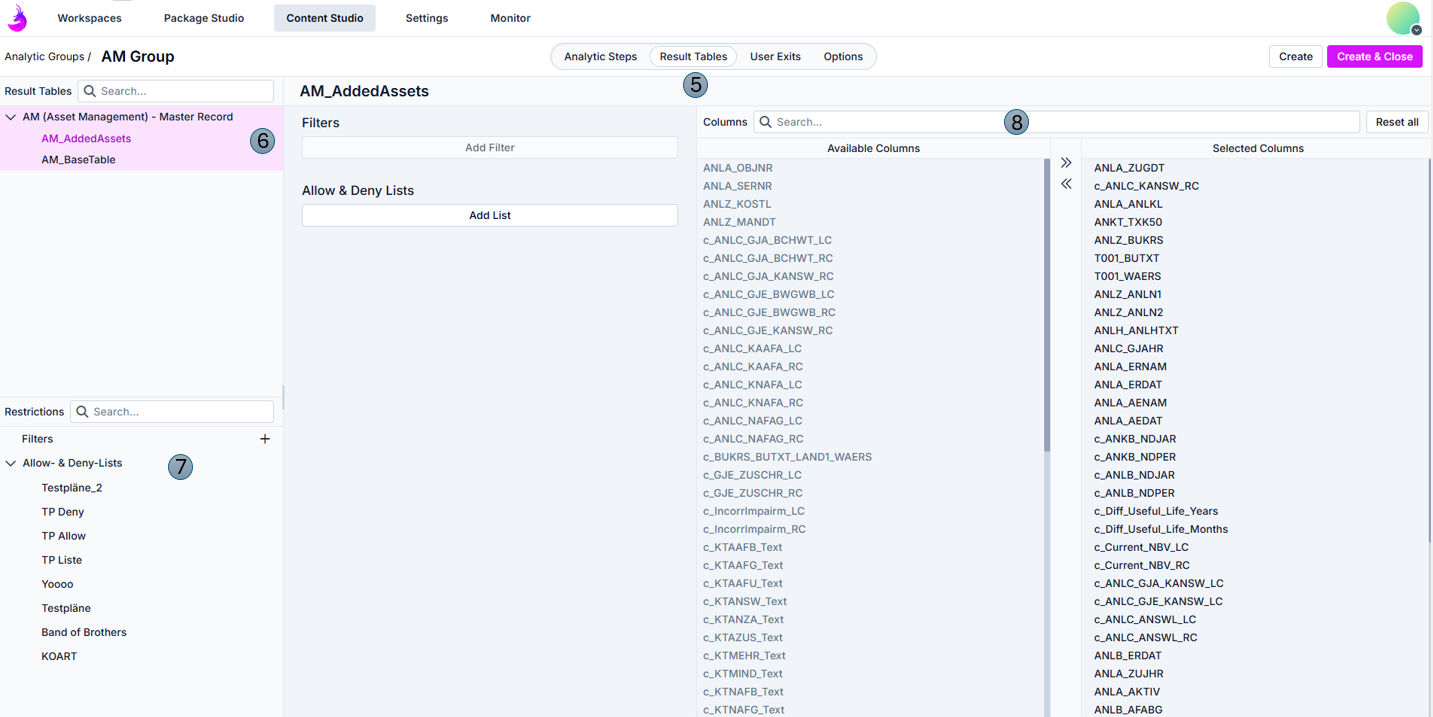
- Tab: Result Tables (Optional)
- Result Tables: on the left you can see a list of the tables that are saved as Result Tables after a run has been completed.
- Restrictions: add filters here to further restrict results when saving. With Allow & Deny lists, for example, you can allow or deny certain currencies, which means that they either remain in the Result Table or are sorted out.
- Filters

- If you click on the + next to Filters at the bottom left, this selection window appears. You can choose between different operators here:
Operator | Description | Example |
= | Equal: both values are equal | 100 = 100 |
<> | Not Equal: both values are not equal | 100 <> 99 |
< | Less as: one value is less than the other | 99 < 100 |
> | Greater as: one value is greater than the other | 100 > 99 |
<= | Less equal: one value is less than or equal to the other | 99/100 <= 100 |
>= | Greater equal: one value is greather than or equal to the other | 100 >= 99/100 |
Like | One value contains parts of the other value, also requires the % sign | %est is contained in Test |
- Use the floppy disk icon to save the filter selection
- You can exit this view by pressing the X
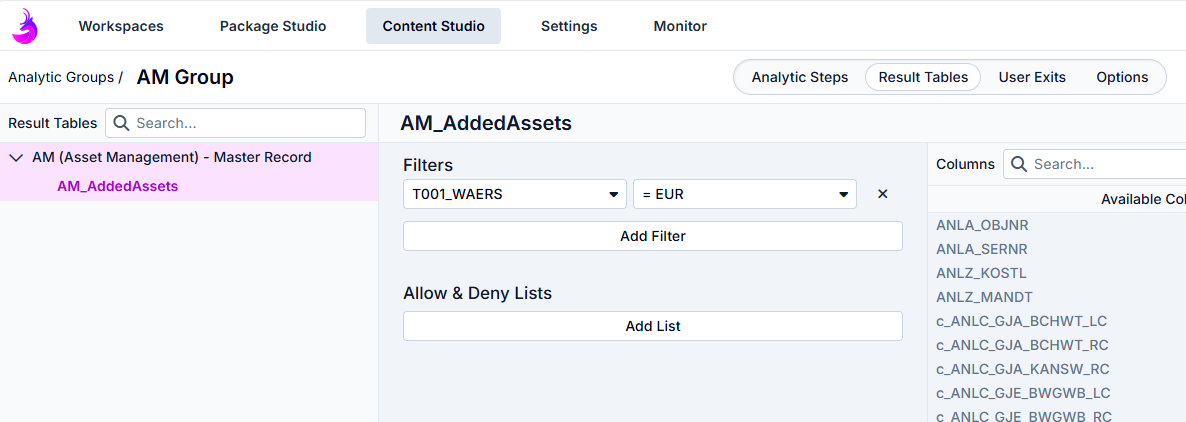
- You can use the Add Filter button to create a filter for each results table
- Select the field you want to filter in the dropdown on the left
- Select the filter you want to use for the selected field from the dropdown on the right
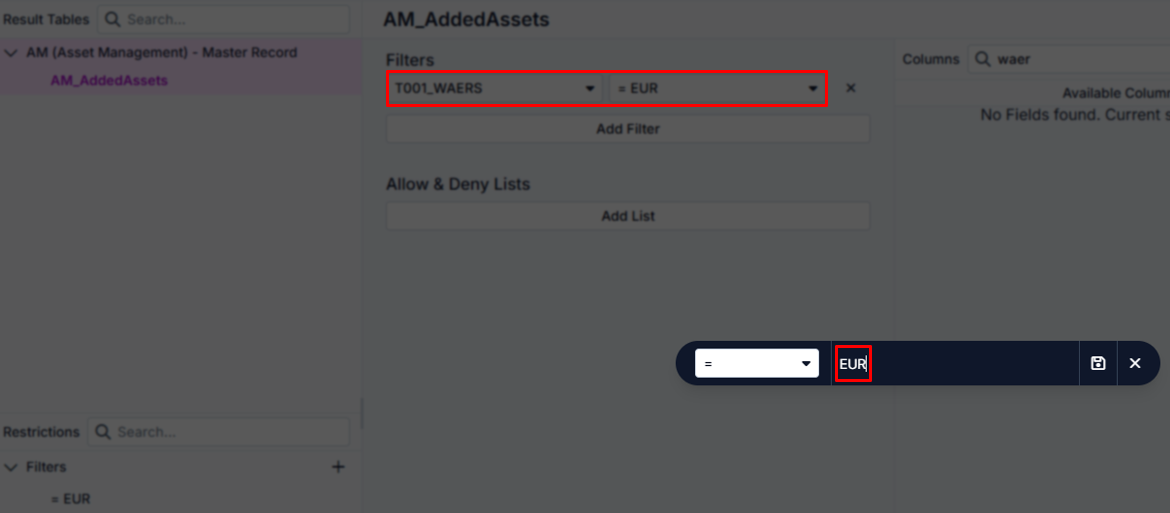
- Here you can see the use of the % sign in combination with the LIKE operator
If you apply several filters to a results table (as in the screenshot above), these are combined with an AND.
- Allow & Deny Lists
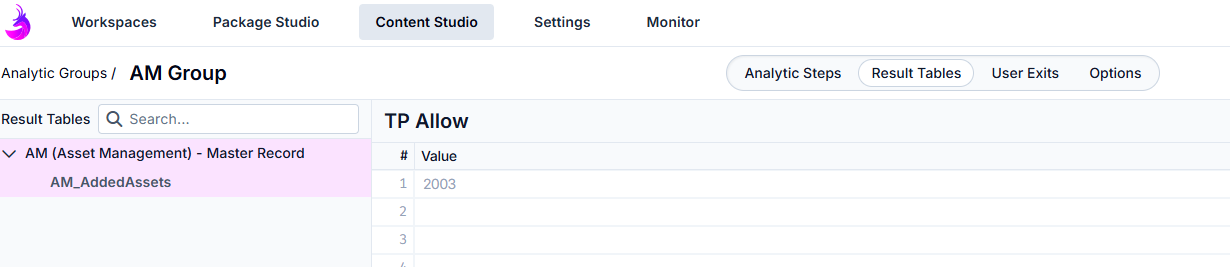
- At the bottom left under the filters you can see the existing Allow & Deny Lists (in this article you can find out how to create such lists)
- By clicking on one of these lists, you can see the values it contains (here in the example currencies)
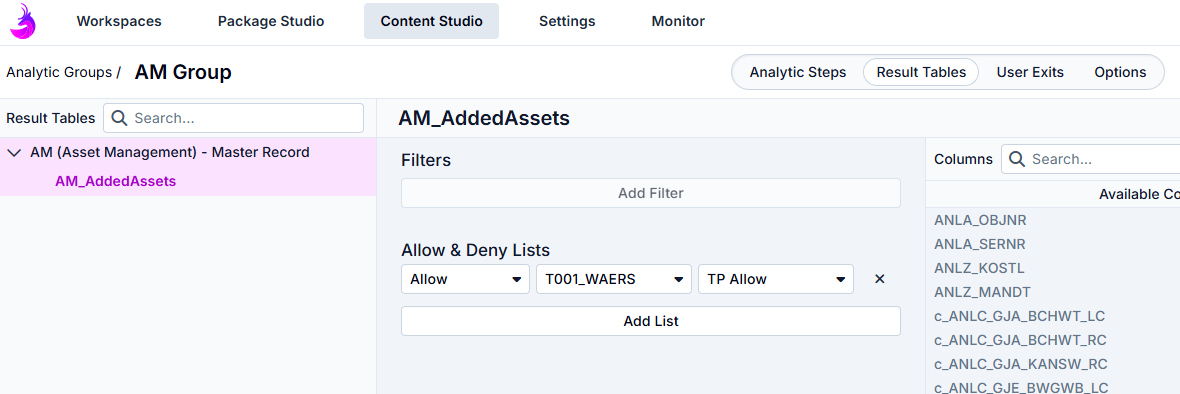
- Use the Add List button in the middle to add an Allow & Deny List for one of the results tables
- From the dropdown, select whether the values contained in the list should be permitted (Allow) or prohibited (Deny): depending on this selection, such values are then available in the results table or are sorted out
- In the dropdown on the left, you specify for which field in which results table this restriction should apply: here the Currency field in the BKPF
- In the dropdown on the right you specify which Allow & Deny List should be used: here is the list with the currencies from above
- Columns: for each results table, specify which of the available columns should ultimately be output and saved. You can drag the columns from Available Columns to Selected Columns or change the sorting of these columns using drag & drop.
User Exits

- Tab: User Exits (Optional)
- Analytic Steps: shows you the tables for which User Exits can be created
- User Exits: existing User Exits can be selected in the middle (the user exits must first be created under Content Studio > User Exits - you can find out how to create user exits in this article).
Options
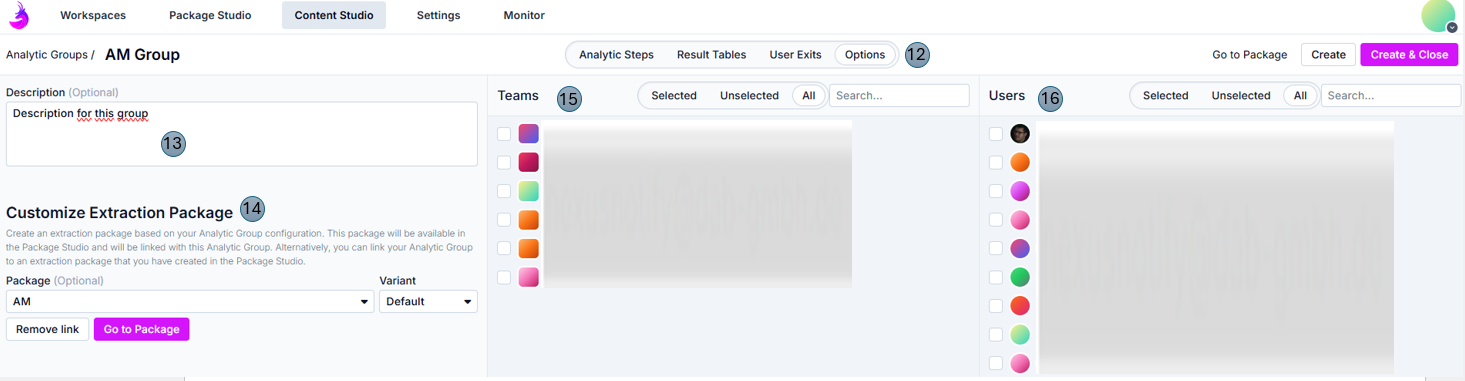
- Tab: Options (Optional)
- Description: enter a description
- Customize Extraction Package: you can either create a new extraction package tailored to this analytic group or select an existing one. Under 'Package', choose the desired package and then select a variant. 'Default' is the standard option.
- Teams: add existing teams to this Analytic Group
- Users: add existing users to this Analytic Group
- Create or Create & Close: as soon as all settings have been entered, the analytic group can be saved. Create & Close creates it, this view is automatically exited and you return to the overview of existing analytic groups. A message for the successful creation of the group appears here.
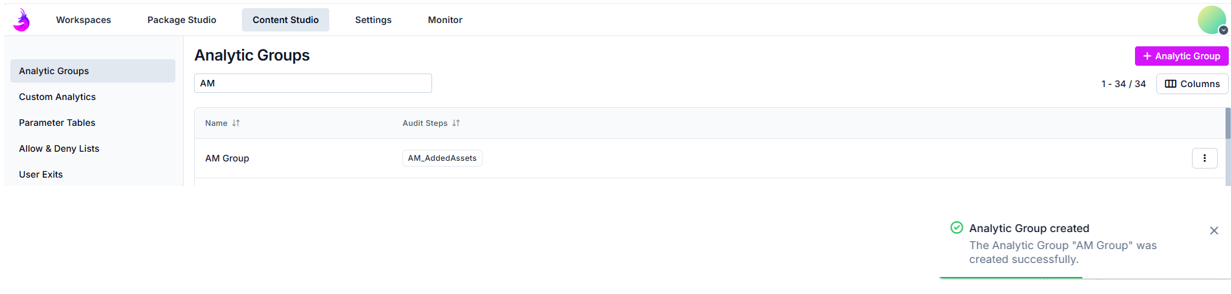
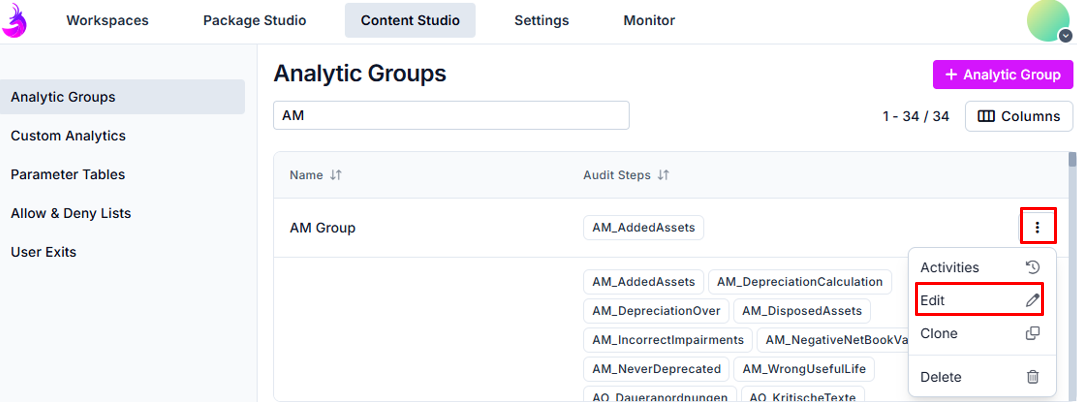
In the overview, you will now see the Analytic Group you have just created, with the optional description to the right of the name of the Analytic Group. The individual analytic steps are listed below this. If you hover over the name of the group with the mouse pointer, you will see three dots. You can use these to edit (Edit), copy (Clone) or delete (Delete) the analytic group.
We recommend that you test your Anayltic Group before using it in your production environment or for production purposes to ensure that it works as intended.
Changes of Analytic Groups
Changes to an analytic group can affect active and scheduled Tasks that have been assigned to this group. When you save the changes, you will receive a corresponding message again.
You can edit each of these groups in the overview list of Analytic Groups. To do this, click on the three dots next to the name and then on Edit.
You can now adjust all possible settings for the analytic group, just as you did when you created it.
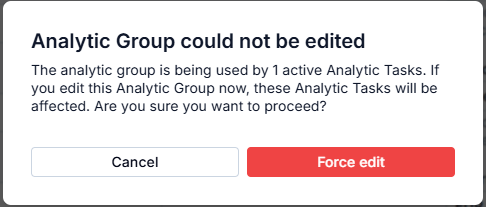
If you click on Save or Save & Close in the top right-hand corner, you will be asked whether you really want to save the adjustments: clicking on Force edit can affect tasks that use this Analytic Group.
Deletion of Analytic Groups
If you delete an Analytic Group that is assigned to an active, scheduled Task, this Task is deactivated and cannot be reactivated. Before deleting, you will receive another message showing you this information.
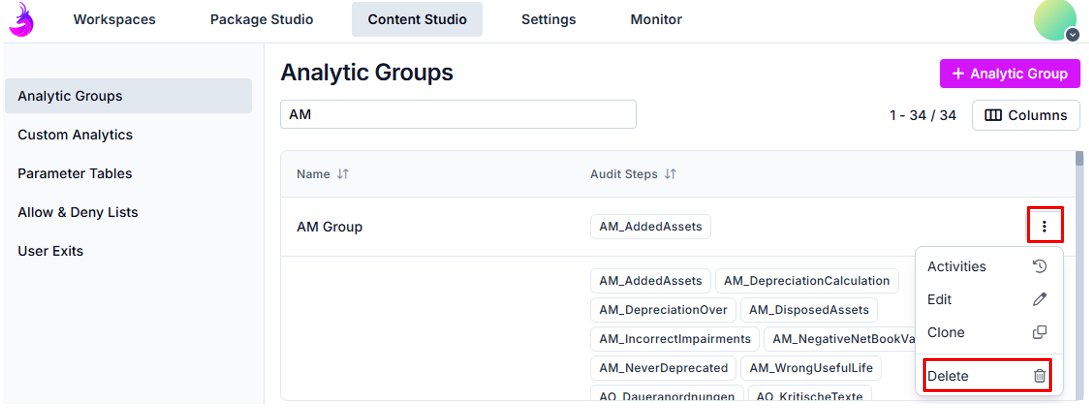
If you want to delete Analytic Groups that are no longer required or were created by mistake, you can click on the three dots to the right of the name and then on Delete.
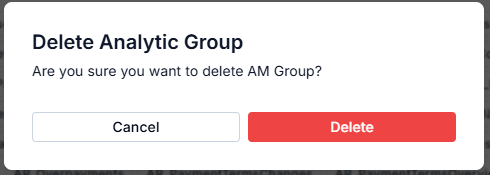
Here you can either cancel the process or confirm that you really want to delete the group.
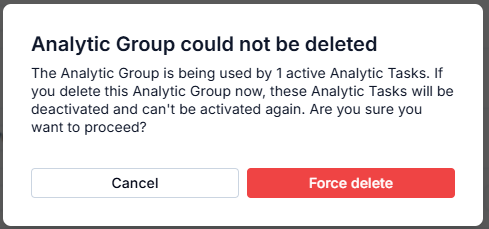
As already mentioned in the warning above, you will again receive a message informing you of assigned and scheduled tasks that use this analytic group.
Here too, you can either cancel the process or force the deletion, which results in all active tasks that use this analytic group being deactivated.